Waterproof Laminate Flooring Installation
I am so excited to share how I laid new flooring in my kitchen remodel! The flooring I chose was this beautiful Mohawk RevWood Select flooring from Znet Flooring. It is a laminate “floating” floor and underlayment that promises to be waterproof! Let me share my laminate flooring installation with you. In the days leading up to your installation, bring your flooring inside to acclimate to the house’s temperature and humidity at least 48 hours before you want to start.
This post may contain affiliate links or sponsored content. For full disclosures and practices, please visit my policy page.
Table of Contents
Getting Started
The first thing I had to do was rip up the old flooring. I then was ready to prep my subfloor. To do this you have to fill in any gouges with a flooring patching product. I just did this to get everything flat and stable and removed any excess staples on the floor. Sand the floor with a random orbital sander and finish it off with good vacuuming to clean everything up. From there, I was ready to install my underlayment.

I chose to use a real sound underlayment that had both sound and moisture protection with a plastic layer on the bottom. This underlayment has a sticky adhesive strip on one side that connects the pieces together without using tape! Once the underlayment was finished, I was ready to lay planks.

Planning it Out
You want to make sure that when placing your new waterproof laminate flooring, that it fits under your trim work and is not higher than any door threshold. The door unfortunately was too low to the ground to open correctly so I used my oscillating multitool to trim off the bottom of the door. Laying the first plank involves a lot of math so I decided to draw out the layout. I needed to plan accordingly so none of my ends would end up with less than two inches of flooring. Take the width of the planks, in my case that was seven and a half inches, and divide that by the dimensions of the room.

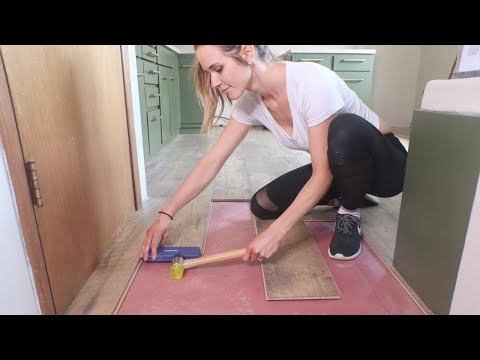
After figuring that out, I started cutting out one of the planks to go around the door. I decided to do this plank first since it was going to be the most difficult to measure out and install. Whenever you’re installing flooring you need a 3/8″ to 1/2″ gap around all of the edges. The blue spacers against all the walls allow the laminate flooring to expand and contract with the humidity and temperature changes of the environment. The three main installation tools I needed were a tapping block, a mallet, and then a black bar for flooring installation.

Once I lay the first plank of waterproof laminate flooring, I can plan out the pattern. My planks were 7.5 inches wide and 54 inches long. I wanted to stagger the seams, so I decided to stagger at every 11 inches. I did this to have it work out that none of my seams were within 10 inches of each other. Then I made sure my staggering pattern would work to make the floor look natural and less predictable.

Laying Down the Planks
I decided from here to cut my planks for the line right next to the cabinets. I had to connect the short seam first because it was impossible for me to lean up the plank underneath the cabinets. Once I have the seam tight, I slid it into place underneath the cabinets and used the black bar to tap the long seam into place. Using spacers on all edges makes it easier to tap your planks into place when you have something to tap against.

After the first row was laid, I had my measurements laid out, and my design laid out, the rest of the planks was fairly easy. A couple of tips I found were to always uses a tapping block for every single plank. This ensures that the planks remain secure and seams tight. When measuring the end of a row, sometimes it’s easier to flip your plank backward and mark it. You can then cut it on your jigsaw or miter saw without having to use a tape measure.

Laminate Flooring Installation Tips
I personally think it is better to not run the flooring underneath the cabinetry for a couple of reasons. One, the height of your flooring will mess up the standard height of your counters. A second reason is that the flooring shifts slightly and it can cause buckling due to heavy cabinets. Another tip while using the spacers is to sandwich them and put the bigger tip-in followed by the skinnier tip. This method still allowed the correct sized gap and it was easier to remove the spacers when I was done laying the floor.

In order to ensure the flooring is waterproof I had to seal the edges under where my baseboards will go. Remove all of the spacers and install foam backer rod. Just push it all the way down in the cracks so it doesn’t interfere with any baseboards. Since the backer rod is foam, it will allow the waterproof laminate flooring to expand and contract as it needs to. From there, I added 100% silicone along the bottom and top edges of the backer rod. I did this process around the entire room. To finish, I then replaced all the baseboards and installed the toe kicks underneath the cabinets.

I absolutely love how this flooring looks. I love the wide plank look that is distressed. It also was such an added bonus that this is waterproof laminate flooring. If you love the look of these floors as much as I do, you can buy these floors at znetflooring.com!

If you liked this interior upgrade DIY and want to see more, my post on how to lay self leveling concrete is a great place to start!